Showing posts with label Recipe. Show all posts

End of the Seminole pumpkin season

What a bountiful crop! 

The 3 Seminole pumpkin vines took over the whole 18' x 5' bed. Wow. I'm holding a ripe and a green pumpkin--these babies weigh almost 5 pounds each. I got the feeling that if I stood for too long near one of its many growth points, that it would start to twine around my ankle. :-) 
The fruits matured quickly. Look at this:
A female flower with one of its pollinators. Note the other fruit in the background.Only 6 days later that same fruit has grown to 12 inches long. It eventually had a rounder bulb at the bottom, but it "only" grew another 2 or 3 inches in length.
This is the first year I've grown Seminole pumpkin (Cucurbita moschata) and what a nice surprise. I bought them from Southern Exposure Seed Exchange. Back at the  beginning of June I posted Squash family on the menu when we had lots of different members of the squash family doing well, but soon after that most of them faded with the heat of summer, but not these. They had just gotten started back then and grew even faster and more vigorously into the summer. The 3 vines took up the whole 5' x 18' bed and each day I walked the perimeter to direct new growth back into the bed. The skin on the fruit is thick so it withstands attacks from worms and from rotting, so there were no problems leaving them on the vine to ripen.

The last harvest on Sept. 1.

The flowers are 6" across and there are many more male flowers than female flowers--the ratio was probably around 5 to 1, but this leads to many many pollinators buzzing around so all the female flowers were fertilized and grew into full-sized fruits.

There were 2 different shapes--a squat, pumpkin shape and a  larger long-necked shape. I read that different shapes can grow on the same vine, but I did not try to verify this. The tangle of vines was too great.  The long-necked fruits weighed between 4 and 5 pounds and that's a lot of squash to use.

Native to South America

This vigorous squash is native to South America, but it had been traded northward by indigenous peoples up into Florida and was present before Europeans arrived. It is not considered native to Florida in its profile on The Atlas of Florida Plants. Even though presence of a plant before the Europeans is one test of nativeness, it's not in this case because it had a known history of importation and it never really established itself in natural areas according to Bruce Hansen one of the curators of the website. If you look at its widely scattered distribution, today in Florida, this has the mark of an introduced species rather than a natural population. I'm sure the indigenous peoples and later the Seminoles appreciated this heat loving squash.

Harvesting green or ripe

I harvested about half of the pumpkins while they were still green, which I used for soups, in salads, in pumpkin burgers, and for breads. The ripened fruits turned a dark, rich tan and the fruit at this point is sweeter and is more suitable to roasting (in the oven or on the grill), stir fries, pies, and other pumpkin-type recipes, but I also used ripe pumpkin in the soup and salads, as well. I used the grated fruit (both ripe and green) raw in various types of salads (pasta, potato, tossed, and tuna) where the fruit added bulk, texture, and a slight taste tone. I have frozen quite a number of 2-cup portions of grated pumpkin for future use in bread and other uses. I prepared seeds for eating from both green and ripened fruit--the ripe seeds are much better.

I baked 2 pie crusts and made these 2 excellent dishes. The pie before hurricane Irma and the quiche 5 days later--after we got power again.  (We do have a generator that plugs into a circuit breaker splitter so we had the refrigerator, lights, microwave, but not the stove.)

Seminole pumpkin pie

For the pie I chose a ripened pumpkinI just cooked the bottom part of the pumpkin and used the neck for other dishes including a pasta salad and the quiche (below). I also prepared the seeds.

It's Seminole pumpkin pie time!
Ingredients:
• 1 pre-baked pie crust
• The bottom half of a Seminole pumpkin, halved lengthwise and seeded
• 1/3 cup sugar, or to taste (As sweet as this was, I probably could have skipped the sugar.)
• 1/2 teaspoon nutmeg
• 1-1/2 teaspoons cinnamon
• 1/2 tablespoon vanilla
• 1 cup nonfat plain yogurt
• 3 large eggs, beaten

Directions:
1. Microwave the pumpkin flesh-side down in a glass pan with 1/2" of water for 15 minutes or so. It should be soft.
2. Cool, then scoop out the squash and puree it in a food processor. You should end up with about 3-1/2 cups of puree.
3. Preheat the oven to 400°F. In a food processor or a large bowl, beat together the squash, sugar, spices, vanilla, yogurt until smooth. Taste for sweetness and spiciness, add more sugar and/or spices if needed. Then beat in the eggs. (The eggs are added last so the tasting does not include raw egg.)
4. Pour the filling into the baked pie shell (pour the excess into oven-proof dish for baked custard).
5. Set the pie on a cookie sheet to catch any spills. Bake 15 minutes then reduce heat to 325°F. Bake another 45 minutes to 1 hour. The pie is done when a knife inserted an inch or more in from the edge comes out nearly clean (the center will still be soft).

6. Cool at room temperature for at least 15 minutes. Chill if you are holding it more than a couple of hours. Best served at room temperature.

Seminole Pumpkin & Malabar Spinach Quiche

Pouring the egg mixture onto the layers of
ingredients for the Seminole pumpkin
& Malabar spinach quiche. 
Toward the end of summer, Malabar spinach is plentiful and serves quite well in this dish.

Ingredients:
  • 1 pre-baked pie crust
  • 1/2 cup Malabar spinach, chopped
  • 1/4 cup garlic chives, chopped
  • 4 oz can of sliced mushrooms, drained
  • 1 tablespoon minced garlic
  • 1 medium onion chopped, about 3/4 cup
  • 4 large eggs
  • 1/2 cup nonfat plain yogurt
  • 1/3 cup grated Parmesan cheese
  • 1 cup shredded cheese (maybe 1/2 Cheddar & 1/2 Mexican mix)
  • 2/3 cup grated Seminole pumpkin (picked green or fully ripened--the state of ripeness will change the taste, both are good)
  • Olive oil to pre-fry onions, mushrooms, garlic, garlic chives, and spinach
  • 1/2 cup white wine
  • Fresh ground pepper, to taste
Directions:
Delicious!
  1. Prepare the pie crust before you start, even a day or two before is fine.
  2. Place onions, mushrooms, garlic in a pre-heated skillet coated with olive oil. Fry over medium heat until onions start to brown then add the garlic chives and Malabar spinach for only a minute or so. Reduce heat and add the wine to mixture to clear the glazed onions from the bottom. When the liquid has evaporated, remove from heat, and set aside.
  3. Preheat oven to 350°F. 
  4. Whisk together eggs, yogurt, and parmesan cheese until combined. Add fresh ground pepper. 
  5. Lay a thin layer of the shredded cheese in the pie crust, add the pumpkin, and then evenly spread the fried mixture on top. Add the rest of the shredded cheese. Pour the egg mixture on top. Poke the egg mixture with a fork so that it settles into the layers. Sprinkle more parmesan cheese on top.
  6. Bake the quiche until it is golden brown on top and the center is firm. Depending on your oven, this will take anywhere between 45 minutes and 1 hour. It's a good idea to place a cookie sheet under the pie to catch the drippings. Allow to cool for 5 to 10 minutes before slicing and serving.

And then suddenly they were gone...

The vines died back quite suddenly.The roots at the base of the 3 vines were filled with root knot nematode damage, but the roots that sprouted along the stems were not infested.
It was a surprise to see how fast these vigorous and bountiful vines died. It began just before hurricane Irma, but after the hurricane they were totally gone. We still have several pumpkins in a paper bag at the bottom of our pantry and people say they will keep a year because of their thick skins, but we have found so many uses for them that they will not last beyond Thanksgiving.

One of two new books to be released in Spring 2018

Growing food is good for our planet

In doing the research for "Climate-Wise Landscaping" one of the two books of mine that are coming out in Spring of 2018, I found a study that shows that every pound of food that you grow or obtain locally offsets up to 2 pounds of greenhouse gas emissions. I grew so many pounds of pounds of Seminole Pumpkins that the world is surely a better place now.

I hope you try growing this bountiful crop and stay tuned for news on my new books and my fall 2018 book tour.


Green Gardening Matters,
Ginny Stibolt

Reworking the elevated rain barrels

I'd been using these elevated barrels since Feb. 2009.

These 3 elevated rain barrels have been well used over the years, because their placement near the edible gardens means that I have been able to use a hose to water thirsty crops rather than hauling watering cans. My back has been grateful.

Our best growing season here in north Florida is Fall, Winter, and early Spring--these are our dry months, but rarely have the barrels run dry during those times. I also have 3 other rain barrels not too far away, but they have not been set up with a single drain like these. See my post Three More Barrels for details on how my husband installed them.

After 8 years, it was time to rework the barrels...

Neat tubes of algae lined most of the pipes.

The wood platform should have had better bracing, because a few years after installation that the wood began to sag under the weight when the three 55-gallon barrels were full. Still, the sag was okay, but recently the wood had begun to rot and carpenter bees had drilled into it even though it was pressure treated lumber. It was time to replace the platform.

We took advantage of the slow beginning of the wet season in June and drained the barrels. Then my husband dismantled the piping and removed the barrels from the damaged platform. He thoroughly rinsed out the barrels and let them completely dry out.

Neat tubes of algae lined the pipes. They were added to the compost pile.

Cinder blocks replaced the wood

Lesson learned: avoid wood. Cinder blocks offer a number of advantages for this situation, so we made the switch.

Checking the levels. It's important that for this type of installation that all the barrels are at the same level. Each barrel sat on its own tower of cinder blocks This time the plumbing is exposed.
He reused the water-tight screw-in fittings in the bottom holes of the barrels. This is what allows all the barrels to fill up and drain as a unit.

The drain pipes were hooked together and then to the spigot.The barrels were not as elevated as before, so extensions up closer to the gutter drains were needed.

A metal stake was attached to the spigot with a plastic tie to stabilize it. Then the hose was attached. We were ready to go...A few weeks later: Checking the levels after the barrels were filled.
Then the rains came and the barrels were quickly filled. After a particularly heavy rain, my husband checked the levels between the barrels, because the 3 barrels need to stay even.

The finished set-up

One other item, is the overflow pipes. When the barrels fill up the excess water is directed through a pipe attached to the tops of the barrels. This pipe is attached to a hose that carries this excess water out behind the shed to a swale where it can be absorbed into the soil.
At ground level the overflow pipe attaches to a hose--to the left of this photo.Top view of the overflow pipes.
Now our 3 elevated barrels are useful again. Yay!

Seminole pumpkins!

Note the Seminole pumpkins to the right of the rain barrels in the above photo. They are still going strong in August. What a bountiful crop we've enjoyed.
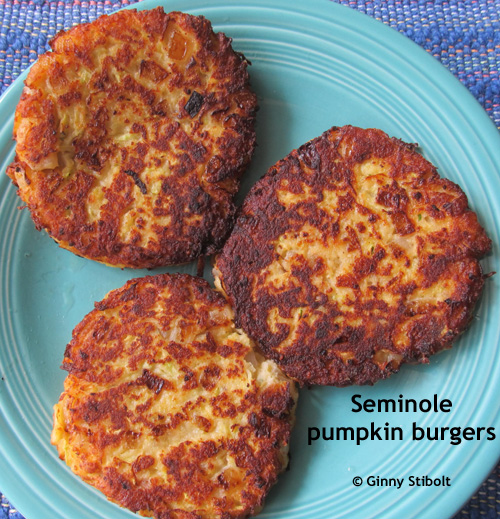
A Seminole pumpkin watcher...There is a a lot to watch for because the pollinators are thick around the pumpkin flowers.These Seminole pumpkin burgers were delish!
The Seminole pumpkins have been fantastic this summer well after all the other members of the squash family have given up in the hot, wet Florida summer. I've made several batches of squash soup that I wrote about in Squash family on our menu.The latest rendition of this soup included a bunch of lime basil, which gave it a sharper citrus flavor. I wrote about how well this does in our summers in Lime basil. I've also made Seminole pumpkin bread using a modified zucchini bread recipe--also delicious. But the burgers were a new innovation.

Recipe for Seminole pumpkin burgers

For 6 burgers:
2 cups of grated Seminole pumpkin--picked while still green and peeled before grating
1/3 cup grated Parmesan cheese
1/4 cup plain nonfat yogurt
1/3 cup flour
1/2 cup potato flakes (approximate)
1/2 cup pre-sauted diced onions with diced garlic (almost a cup before cooking)
3 medium eggs
Fresh ground pepper to taste
Enough olive oil to have about 1/8th of an inch in the pan
Mix all ingredients (except oil) in a bowl and adjust the consistency with the potato flakes so that the patty stays together.
Heat oil to 350 degrees (we use an induction burner so have exact temps.)
Cook for several minutes on each side, but move the patty around in the oil so it doesn't stick.
Cook one side to brown as shown and flip to other side.Cook only 1 or 2 burgers as once to keep enough room to flip the burgers. 
Yummy as is, but filling. We each ate only 2 or our 3. The next day, we used the remaining 2 to make cheeseburgers with a slice of tomato and served with Mayo and lettuce on whole grained bread fried in olive oil.
The beautyberries are adding color to become
their amazingly eye-popping  purple of fall.  

Late summer!


You know it's officially late summer when the beautyberries start turning purple. They will become unbelievably purple and will feed the migratory birds that come through our yard this winter.

I hope you're enjoying your summer.

Green Gardening Matters,
Ginny Stibolt

Squash family on our menu

3 different species of bee work a
Seminole pumpkin flower.

The Squash family

There are quite a few important crops in this family (Curcubitaceae), from cucumbers and melons to zucchinis and pumpkins, all members of this family have separate male and female flowers which need to be pollinated--most female flowers need to be visited by pollinators (mostly bees and wasps) 7 to 10 times before a fruit forms. The female flower sits atop a small preformed fruit, while the male flower is borne on a long stalk. If a fruit does not grow after the flower fades and it turns yellow, this usually means that it was not fertilized.

Most squash vines put out several to many male flowers first before the first female flower is formed. My guess is that this strategy attracts pollinators to the area before it spends the extra energy to form a female flower.

Up until 2 weeks ago, it's been a dry spring, so I've irrigated the squashes every other day at the minimum to keep them from stressing due to wilting. This has been hand irrigation with rain barrel water, in addition to the once a week landscape-wide irrigation. The reason for this is that squashes need a consistent and generous amount of water to produce the fastest growth of the fruit.

For more detailed information on growing the squash family crops see our book "Organic Methods for Vegetable Gardening in Florida."


Cucumbers

This year I tried a different variety, Speedy Hybrid, which was on sale from Burpee, but it's done so much better than any others I've grown, that I'll probably stick with this one. The leaves are larger and the crop much more plentiful. Plus they have a nice mild taste. It's a good thing we like them, because we have a lot!

A bountiful cucumber harvest.Female cucumber flowers

Spaghetti squash

Several spaghetti squash vines volunteered as a result of my trench composting seeds and skins from a store-bought squash last winter. Of course we were happy to see this, so I made room for them to sprawl and created a bit of a swale around them so I could irrigate more efficiently.

Trouble in paradise! When growing squash, it's important to keep an eye on them, because sometimes worms will attack, but some varieties are more susceptible than others. So I saw that 2 of these squashes had been invaded--you can tell by the holes and the frass on the outside of the squash. No time to waste, they had to be harvested and cooked right away, otherwise the worms would have continued to eat. We split them, dug out the seeds and made sure that the worms were dead before they went into the compost bucket. Then we cooked them: see below...

Uh-oh! The spaghetti squashes had been attacked.The worms were easy to remove, because they were working in the seed area.

Scooping out the squash after cooking.This squash soup was delicious!!

Squash Soup Recipe

Ingredients:
2 spaghetti squashes
1 cucumber (Since it was fresh from the garden, it was unpeeled, but store-bought cukes need to be peeled to remove all that waxy stuff they use to keep them from wilting.)
2/3 cup plain non-fat yogurt
1 cup of chopped onions
1/2 cup chopped celery
1/4 cup chopped parsley
1/4 cup chopped garlic chives
1/4 cup olive oil
2 tablespoons chopped garlic
1 cup of white wine
Several cherry tomatoes
(Note: the squash, cucumbers, onions, parsley, garlic chives, garlic, and tomatoes are all from our garden harvest.)
-Split squashes, remove seeds (and worms) lay face down in 1/2" water in microwavable pan and cook at full power for 10 minutes or until soft.
-Scoop squash flesh from skins (We stored it in the fridge in a covered bowl for 2 days until we were ready to proceed.)
-Purée squash, yogurt, and uncooked cucumber in food processor. We did this in several steps and each time emptying the contents into our large bowl that has a locking lid. (The first batch with just the squash and yogurt was so sweet it tasted like ice cream!)
-Sauté onions, garlic, and celery in the olive oil over medium to low heat until onions start to caramelize. Reduce the heat and add the parsley and garlic chives and finally add the wine. Cool until room temperature.
-Purée the sautéed mixture as well and stir it into the mixture.
-Serve into bowls and top with a dollop of yogurt and cherry tomatoes cut into halves or quarters. Plus freshly ground pepper.

Butternuts and more...

The new bed in the foreground is covered with butternut squash volunteers. On the other side of the path are 3 Seminole pumpkin vines which have only put out male flowers at this point, the green & white crook-necked squash vines, and then several cucumber vines are growing up on 3 tomato cages, 
Quite a few butternut squashes also volunteered in our new bed next to the elevated rain barrels. Read about building this new bed in this post, but instead of building wide rows for winter vegetables, I buried kitchen scraps methodically one hole after another until the whole bed had been enriched. Obviously one or more of those deposits contained butternut squash seeds, because look at what we harvested, with many more on the way.

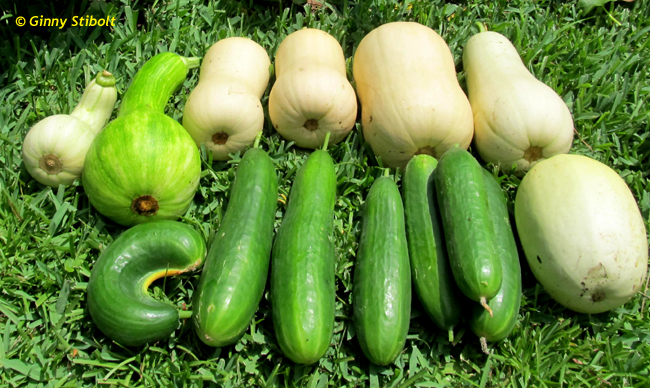
After the first soup, another squash family harvest, with more to come. 
Note the 2 crook-necked squashes in the upper left corner of this display. At first I thought that they were from Delicata, squash vines which has green stripes on an off-white background and no crook neck. Obviously, these don't look like that, so I looked up what else they might be and they look sorta like a Crushaw, but they don't have bumpy, thick skin. It turns out that they were from the Seminole pumpkin vines, which have a variety of shapes. They are a very edible, mild squash.

We used these two crook necks and the one spaghetti squash for our next rendition of our squash soup, using the recipe above except that we used 3 cucumbers. More cucumbery, of course, but still very nice.

Our next squash adventure was the largest butternut, cooked in the water like the others, but then fixed like our cheesy mashed potatoes using sautéd onions and garlic. With shredded cheddar cheese and plain, non-fat yogurt added. Also, quite delish. Many more squashy eating adventures are in our future.

It's times like these where it's clear why our food bills are so much less than they used to be.

Other pollinators in our non-poisoned yard
Giant swallowtails are frequent visitors to our yard even though we don't have any citrus, which is the larval food source, but many of our neighbors do. For more information, see: http://entnemdept.ufl.edu/creatures/citrus/giantswallowtail.htm 

Tiger swallowtail nectaring on an eastern arrowwood (Viburnum dentatum) These butterflies use sweetbay magnolias as their larval food--we have plenty of those. For more info: http://entnemdept.ufl.edu/creatures/bfly/tiger_swallowtail.htm
I hope you are enjoying the fruits of your labor this late spring.

Green Gardening Matters,
Ginny Stibolt

Malabar spinach: a hot weather crop


Malabar spinach
The standard spinach varieties (Spinacea oleracea) are cool-weather annuals that are a little temperamental in Florida. Spinach is a member of the amaranth family (Amaranthaceae), which also includes chard, beets, and quinoa. All members of this family contain oxalate crystals in their leaves which can cause problems with kidney stones when eaten raw. Cooking or vinegar dressing will break down the crystals.

Malabar spinach

Malabar spinach (Basella rubra and B. alba) is a heat-tolerant, vining plant with leaves that taste like spinach. The two species differ in stem color--red or green. The red is striking--an ornamental edible. It's a perennial in frost-free zones and a freely seeding annual in the rest of the state.

This crop is a member of the basella family (Basellaceae) and is not closely related to spinach and has no oxalate crystals.


Leaves wilt quickly: hydrate them in a bowl of water
while waiting to serve them.
You can plant seeds or plant cuttings from the previous year's vines. You won't need many of these--each vine puts out an amazing amount of growth. Cut leaves as needed once the vine has grown to about three feet.

The leaves wilt quickly once separated from the vine, so if you need to hold the harvest for more than an hour, arrange the leaves in a container of water—stem-side down. Many growers harvest whole sections of vine and given its aggressive nature, this should not cause a problem.

Use as you would spinach--raw or cooked. It has a slightly mucilaginous texture and can be used as a thickener in soups and stews, but is not as thick as okra. Most people don't notice any sliminess when it's mixed with other greens in a salad.

I used one recent harvest in Green Goddess Eggs.

Green Goddess Eggs Recipe

For me this is a cook-to-the-harvest recipe and will vary depending upon what's available from the garden.

Ingredients:
Egg & cheese mixture:
4 large eggs
3/4 cup cheese, preferably Feta
1/2 cup plain non-fat yogurt
2 tablespoons pesto*
2 tablespoons dried parsley
freshly ground pepper to taste

Frying mixture:
1/2 sweet onion
1/3 green bell pepper
1/3 cup celery
1/2 cup mushrooms (4 oz can)
1/3 cup garlic chives
1/3 cup black olives
enough olive oil to fry this mixture and lubricate the pan for the egg mixture.
Procedures:
- Crack the eggs into a medium sized bowl
- Add the yogurt, pesto, cheese, dried herbs, and pepper and stir well with a fork and let this mixture sit while you prepare the other ingredients..
- Chop the onion, pepper, celery, & garlic chives.
- Slice the olives and mushrooms.
- Cover the bottom of a frying pan with olive oil and preheat with medium heat.
- Add the frying ingredients, but hold the garlic chives and the olives until later. Turn down the heat after adding and slowly fry the mixture until the onions become translucent and begin to caramelize.
-Add the olives and the garlic chives and fry until heated.
- Scrape the fried ingredients to the side and add more olive oil before adding the egg mixture.
- Scramble the eggs with the fried vegetables to your liking.
- Serve alone or wrapped in 2 fried flour tortillas for burritos.


*Ginny's pseudo-pesto recipe

My pesto is different than most because I incorporate more ingredients to produce something that is more of a pesto-like sauce.  In the blender or food processor: 6 or 7 stems of basil with most of the main stem parts removed, one half of a medium yellow onion, 3 or 4 green onion stalks with roots removed, 2 or 3 bunches of garlic chives, 1/4 cup grated Parmesan cheese, 1/4 cup mayonnaise,  1/4 cup roasted sunflower seeds, 1/4 cup non-fat plain yogurt, 1 tablespoon of minced garlic, 1 tablespoon horseradish, freshly ground pepper to taste, and enough olive oil to make it creamy but not slimy.
Each time I made pesto it's different because of the greens that are available. I keep about a cup to use fresh, the rest I freeze in small Rubbermaid containers, so I always have some handy.

This summer's so called wet season

Looming clouds did not mean rain on this day.
It's been pretty darn dry for the wet season. July normally averages 6.5 inches, but so far we've had barely an inch. fortunately, the rain barrel water has been available to irrigate our edible beds, the compost pile, and a few woody plants that have been transplanted in the last year or two.

I hope you have rain barrels to use for your summer needs. If not, it's never too later to get started. Start with my first rain barrel article, which has links to several of my other articles for extreme details on open and closed rain barrel systems and how we elevated 3 of or barrels to use in our edible gardens.


Sustainable gardeners sequester as much stormwater as possible on their landscapes.  

Green gardening matters,
Ginny Stibolt

A failed onion crop

My onions failed to form bulbs. Were they a long-day variety?
I've had some wonderful onion harvests in the past, but not this year. See my post A sweet onion harvest to see what a successful onion crop looks like. Note: that crop was harvested in May.

So what happened? 


Well, I was distracted this fall with my #floweredshirttour for my third book, The Art of Maintaining a Florida Native Landscape—35 events in 11 weeks from September 1 to November 15th. Instead of taking the time to order my short-day onion plants, I just bought a package of onion sets, which I'd used before, with reasonable success. See my post, The skinny on onions, back when I was just figuring out what to do in Florida. The information I found at the time said that only short-day onions, which is what we need in Florida because we grow onions through the winter, were available as sets.

But when I looked at these onions at the end of June, none of them had formed a bulb or had begun to go into dormancy. I admit that I did not spend very much time babying them in the fall and then in early March, my husband and I were out of town for almost 2 months, so it's possible that they only needed more irrigation and better weeding. But wouldn't that situation just resulted in smaller onions?
Is the information I found about sets just another old gardener's tale? I think so. I believe that these onions are long-day onions because none of them formed a bulb. See my post: Recipe for failure: Long-day onions in Florida.

On the other hand, my garlic, which was a soft-neck variety, which we need in Florida, also failed, so maybe it was the lack of care. At any rate, I pulled up all the garlic and all the onions the other day. 

The whole, pitiful harvest after cleaning. 

 When faced with a failed crop, make soup!


A delicious cold soup for a hot day...

I made a version of my rogue onion soup, but with no celery because I had soooo many onions to use up. It's sad when a whole harvest can be used up in one batch of soup, but this supplied us with 7 large servings (3 dinners and a lunch for one). But, as usual it was really good and so good for us.

I'm loving my rangy marigolds this year—there is so much more biomass.

Marigolds condition the soil


Some of my tall marigolds had leaned into the path through our edible garden, so I trimmed it back and used those trimmings as a green layer in my working compost pile. The leaves of marigold contain a chemical that repels root knot nematodes, so including them in the compost will help condition my whole garden. Read my post Results: the nematode experiment.


Life on a stick...

Life on a stick


The other day I noticed this dead twig, which was totally covered with various lichens and a small ball moss.

Mother Nature is so efficient in finding places to inhabit. 


I've been reposting my articles from the team blog Native Plants & Wildlife Gardens that has gone dark. Our new space is for archiving only (no comments), but at least they are available. Here's my post there, From lawn to woods, a retrospective. From there, you can go the the blog home to see all the articles that have been posted so far.

I hope you are enjoying your summer.


Green Gardening Matters!
Ginny Stibolt

26 Vegan Recipes For Comfort Food

1. Butternut Squash Mac ‘n Cheeze: Two Ways
Butternut squash pureed into macaroni and cheese just sounds like a match made in heaven, doesn’t it? It is also a fun way to sneak in another veggie. Get the recipe here.


2. Nirvana Enchilada Casserole 
Layers of corn tortilla sopping up spicy, fragrant, red sauce then overstuffed with mushroom, pinto beans and roasted potatoes. On top is a voluptuous cashew creme that will have you rolling your eyes to the back of your head like a zombie. An enchilada zombie.


3. Matzo Ball Soup
These matzo balls are firm and hold together awesomely well. They’re soft on the outside, but delightfully dense and toothsome in the middle. Try it out for yourself.


4. Tofu Popcorn Chick’n (+ it's gluten free)
This tofu chick’n recipe is so versatile. You can eat them on their own as popcorn chick’n or nuggets. You can put it in a wrap or a sandwich, on a pizza – so many possibilities! Try it!


5. Broccoli & Cheeze Soup
Why should dairy eaters have all the creamed soup fun? Create this delicious vegan option, instead.


6. Almost Famous Fried Pickles
It’s hard to believe the pickle can be improved upon, until you fry it up and taste it for yourself. Get the recipe here.

7. Peanut Butter Banana Chip Cookies
In this amazing recipe the sugar content is fairly low. They aren’t cakey, but not too crisp either. Somewhere in the middle with a pleasant crunch and a complex sweetness. And of course, they have a lovely peanut buttery undertone.


8. Mushroom Stout Pie With Potato Biscuits
A fluffy potato biscuit soaking up a deeply savory gravy that is at once mysterious and familiar. The stout really gives this dish an allure, and two kinds of mushrooms make it meaty and earthy and just umami like nobody’s business. And ya know, for a special occasion, it’s not too fussy.


9. Crispy Baked Onion Rings
Crispy, flavorful, and good-for-you, these onion rings make a great snack or addition to any meal. I could also see a big batch of these being made for a party served with a homemade dip. Can also be made gluten-free.


10. Vegetable Lasagna With Kale, Beluga Lentils & Carrots
This delicious lasagna recipe will make you forget about meat and cheese with kale and lentils!! Get the recipe here.


11. Creamed Kale
Nondairy milk and cashews combine to create a creamy sauce for kale or your favorite leafy greens. Try it for yourself!


12. Homemade Vegan Caesar Cocktail
Is this a vegan version of a Caesar cocktail or is it an adapted version of the Bloody Mary? I can’t decide. Whatever you call it, this is one fantastic drink with a whopping 4 servings of vegetables per 500 ml glass. Be sure to add the seasonings to taste and you can’t go wrong. Bottom's up!


13. Chocolate Cupcakes With Avocado Chocolate Icing
They say avocados and chocolate are brain foods right? (I don’t know who says, but it seems like something I might have read somewhere). I know it sounds weird and maybe a little gross to put them together but it actually works to make really thick and rich chocolatey frosting. Try out this recipe.


14. Creamy Polenta And Mushrooms
Creamy polenta, chickpeas and a mix of sautéed mushrooms & tarragon. This recipe is sure to be a main stay.


15. Mushroom “Alfredo”
Almonds blended with almond milk make a rich sauce for this vegan pasta dish. We like the flavor and smooth texture of spelt pasta and the way rotini traps the sauce, but feel free to substitute your favorite pasta. Get the recipe here.


16. Mozzarella Sticks
For the full diner experience, crack open a jar of pickles, whip up some vegan milkshakes, and make sure you have marinara sauce on hand. And remember, all food tastes better around 2AM. Dig into the recipe here.


 17. Double Cinnamon Oatmeal Raisin Cookies
A double dose of cinnamon gives these cookies a wonderful spicy aroma and even bigger cinnamon flavor.  Try them out now!


18. Vegan Chili
Hearty, healthy, and always ready to make you happy, this chili makes for a dependable partner. Whip up a batch with this popular recipe.

19. The Philly Reuben Sandwich 
A hefty sandwich, filled with sauerkraut and tangy Russian dressing that oozed out of the edges of the sandwich with each bite. Filled with marinated seitan and wrapped in warm rye bread. Try the recipe yourself


20. Spinach “Chicotta” Stuffed Pasta Shells
“Chicotta” is a new creation that will change the way you look at plant-based cheeses. It’s a ricotta-like cheese made from… chickpeas! With just some chickpeas and a few other simple ingredients, you can whip up the creamiest and most delicious non-dairy cheese you’ve ever tasted. Try this recipe tonight.


21. Miso Shitake Soba Soup
This soup is full of warming healing ingredients (shiitakes, ginger, miso, etc)… and would be the perfect thing if you’re under the weather… figuratively or quite literally. Get the recipe here.


22. Brownie Ice Cream Sandwich
Being a sandwich, this is totally a legit lunch. Grab a pink of Trader Joe's "Soy Creamy" vegan vanilla ice cream! Get the recipe here.


23. Creamy Broccoli And Mushroom Pasta
The vegan parmesan goes so well with the creamy mushrooms, the salty broccoli and the toasted pine nuts with the touch of heat from the red chili flakes. Yum yum yum! Try this recipe tonight!


24. Butterfinger Candy
This recipe is very simple, but you need to know two things before we begin: you must have a candy thermometer for this recipe, and you must read through the entire recipe before you start. Everything comes together quickly, and I certainly don’t wish a candy disaster on anyone.


25. Vegan Big Mac
Not only is this burger healthier and yummier than the original, it is also extremely easy and crazily filling! What a great way to impress your dinner guests with a vegan Big Mac! Try this recipe now!


26. Easy Cheezy Pizza
Nothing beats a yummy cheezy pizza…. Mmmmmm.  Get the recipe here.


[via Buzzfeed]